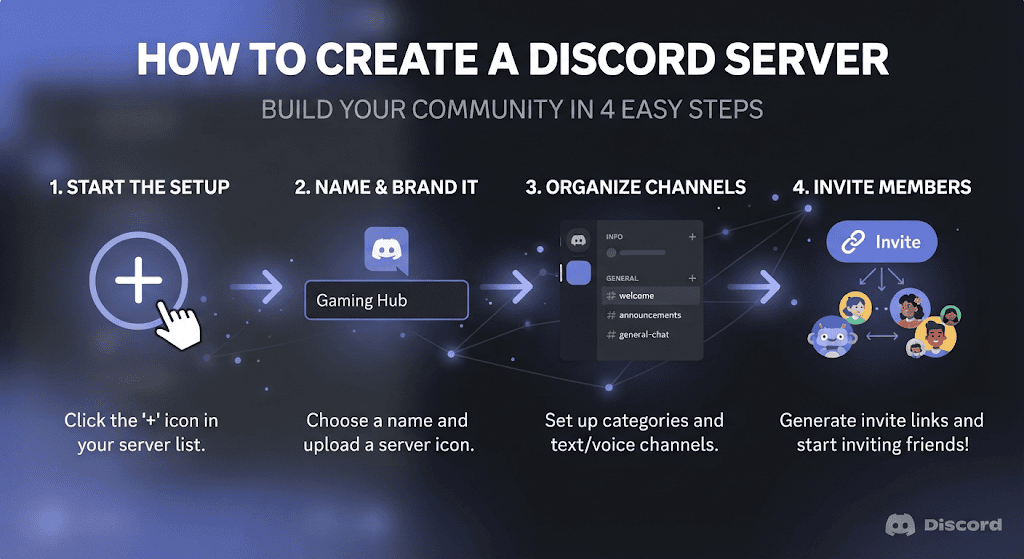
Ever felt like your online group chats are a bit too messy to keep up with? Whether you want a cozy digital hangout space for your friends, a thriving hub for your gaming clan, or a dedicated community for your latest content creation project, learning how to create a discord server is the best way to bring everyone together under one roof.
While Discord’s interface can look a bit overwhelming at first glance, setting up a thriving online community from scratch is actually pretty straightforward. Let’s dive into a step-by-step walkthrough to build a server that looks professional, stays secure, and keeps members coming back.
Step 1: Laying the Groundwork and Building Your Server
Before you invite a single person, you need to spin up the actual space. Fortunately, Discord makes this part take less than a minute.
- Fire up Discord:Open the desktop app, mobile app, or log into your account via web browser.
- Hit the Plus Icon: Look at the far-left sidebar where your server icons live. Scroll down to the bottom and click the + (plus) button.
- Choose Your Template:Discord will ask if you want to use a template (like Gaming, School Club, or Friends) or “Create My Own”. Choosing “For me and my friends” or building from scratch gives you maximum flexibility over your channel layout.
- Add Branding: Give your server a catchy name and upload an eye-catching icon (a 512×512 PNG or JPG works best). Click Create, and your digital home is officially live.
Step 2: Designing a Clean Channel Structure
A messy channel list is the quickest way to confuse newcomers. To keep discussions organized, use categories to group your text and voice channels logically.
- Information Category:Dedicate this to essentials like
#welcome,#rules, and#announcements. Make sure these channels are locked down so only admins can post messages. - Community Category: Create spaces like
#generalfor everyday chatter,#off-topicfor random memes, and#mediafor sharing clips or photos. - Voice Channels: Set up a few casual voice rooms (like “Lounge” or “Game Night”) along with an “AFK” (Away From Keyboard) channel to automatically idle inactive users.
Pro Tip: Resist the urge to create dozens of channels right away. A smaller, active community layout feels much more welcoming than a massive list of empty channels.
Step 3: Setting Up Roles and Permissions
Managing a community requires a solid hierarchy. Head into Server Settings > Roles to establish clear boundaries between members and staff.
- Admin:Full control over the server.Give this only to people you completely trust.
- Moderator:Equipped with permissions to manage messages, kick or temporarily ban unruly users, and handle day-to-day chat flow.
- Member / @everyone: The default baseline role for everyday participants. Ensure they have read and write permissions, but restrict them from sending mass pings (like @everyone or @here) to prevent spam.
Step 4: Adding Essential Bots and Automation
Manual moderation gets exhausting fast. Adding a few trusted bots will help automate your server maintenance and boost engagement:
- Moderation Bot:Tools like AutoMod (built natively into Discord) or third-party bots can automatically filter out spam, catch offensive links, and log rule infractions.
- Welcome Bot: Greets newcomers in your chat with a friendly custom message, making them feel instantly valued.
- Reaction Roles Bot: Allows members to click emojis to self-assign optional notification or hobby roles (like
@Gameror@Stream Alerts) without bothering admins.
Frequently Asked Questions (FAQs)
How do I make a Discord server for free?
Hosting and running a Discord server is 100% free. Simply click the plus icon on your sidebar, follow the quick prompt steps, and you can invite members right away without paying a dime.
How many channels should a new Discord server have?
It is best to start small with about 5 to 8 channels spread across 2 or 3 categories. Too many empty channels can make a new community feel dead, whereas a tight-knit layout naturally encourages active conversations.
How do I invite friends to my new server?
Click your server name at the top left, select Invite People, and copy the permanent invite link. You can share this link directly with friends or post it across your social media profiles.
Conclusion
Learning how to create a discord server opens up endless possibilities for building engaged communities, sharing hobbies, or hanging out with friends. By mapping out a clean channel layout, establishing fair roles, and utilizing smart automation, you’ll create a welcoming space that people actually want to participate in.
Ready to level up your digital hangout? Fire up Discord, click that plus button, and start building your custom community today!