Everyone loves a classic treat that reminds them of home. If you are looking for a snack that is both sweet and salty, peanut butter cookies are the perfect choice. These cookies are famous for their soft centers and crispy edges. Most people recognize them by the cool “criss-cross” pattern on top made with a fork. You do not need to be a professional baker to make these taste amazing. In fact, you probably already have all the ingredients sitting in your kitchen right now. This guide will walk you through every step to ensure your cookies come out perfect every single time.
Quick Recipe Overview Table
| Feature | Details |
| Prep Time | 15 Minutes |
| Bake Time | 10 Minutes |
| Difficulty | Very Easy (Beginner) |
| Main Flavor | Sweet & Salty Peanut Butter |
| Texture | Soft, Chewy, and Slightly Crumbly |
| Special Tool | Fork (for the fork marks) |
Why These are the Best Peanut Butter Cookies
There are many recipes out there, but the best peanut butter cookies balance flavor and texture perfectly. A great cookie should not be too dry or too oily. My secret is using a mix of white sugar for crispiness and brown sugar for chewiness. This combination creates a deep, caramel-like taste that makes the peanut butter pop. When you take a bite, it should melt in your mouth. Many people find that homemade treats are much better than store-bought ones because they lack preservatives. Plus, the smell of baking cookies will make your entire house feel warm and cozy.
Essential Ingredients You Will Need
To start your baking journey, you need a few basic items from your pantry. You will need creamy peanut butter, all-purpose flour, butter, and eggs. Do not forget the baking soda and a pinch of salt to help the flavors stand out. Using creamy peanut butter is usually best for a smooth dough, but crunchy peanut butter works if you like extra texture. Make sure your butter is at room temperature before you begin. This helps it mix smoothly with the sugar. High-quality vanilla extract also adds a lovely scent and a layer of sweetness that rounds out the salty notes of the nuts.
Choosing the Right Peanut Butter
When making peanut butter cookies, the type of nut butter you choose matters a lot. I recommend using standard commercial brands like Jif or Skippy for the most consistent results. Natural peanut butters that require stirring can sometimes be too oily, which might make your cookies spread too much in the oven. If you do use natural peanut butter, give it a very good stir to make sure the oil is fully mixed in. The goal is to have a thick, stable dough that holds its shape. If your dough feels too soft, you can chill it in the fridge for thirty minutes.
Step-by-Step Mixing Instructions
First, cream the butter and sugars together until the mixture looks fluffy and light. Next, add your egg and the star of the show: the peanut butter. Slowly stir in your dry ingredients like flour and baking soda. You want to mix until you no longer see white streaks of flour. Be careful not to overmix the dough, or the cookies might become tough. The dough should feel soft but not sticky enough to stay on your hands. Once the dough is ready, you can start rolling it into small balls about the size of a golf ball.
Creating the Iconic Fork Marks
The most fun part of making peanut butter cookies is adding the signature “criss-cross” pattern. After placing the dough balls on a baking sheet, take a fork and press it down gently into the top of each ball. Then, turn the fork ninety degrees and press down again. This creates a beautiful grid pattern that helps the cookie bake evenly. It also flattens the dough just enough so the middle stays soft while the edges get crunchy. If the fork sticks to the dough, dip it in a little bit of extra sugar between each press.
Perfect Baking Temperature and Timing
Setting your oven to the right temperature is key for success. Most peanut butter cookies bake best at 350°F (175°C). You should bake them for about 8 to 10 minutes. It is important to remember that cookies continue to cook on the hot tray even after you take them out. They might look a little soft or “underdone” when the timer goes off, but that is actually a good thing! Let them rest on the baking sheet for five minutes before moving them to a wire rack. This patience ensures they stay soft and do not break apart when you pick them up.
Tips for Soft and Chewy Results
If you prefer a softer cookie, try adding an extra tablespoon of brown sugar. Brown sugar contains molasses, which holds onto moisture and keeps the peanut butter cookies from getting hard. Another trick is to avoid over-baking them; even one extra minute can turn a soft cookie into a crunchy one. I always set my timer for the shortest recommended time and check them early. If the edges are golden brown, they are ready to come out. Storing them in an airtight container with a slice of white bread also helps keep them fresh for days.
Fun Variations to Try at Home
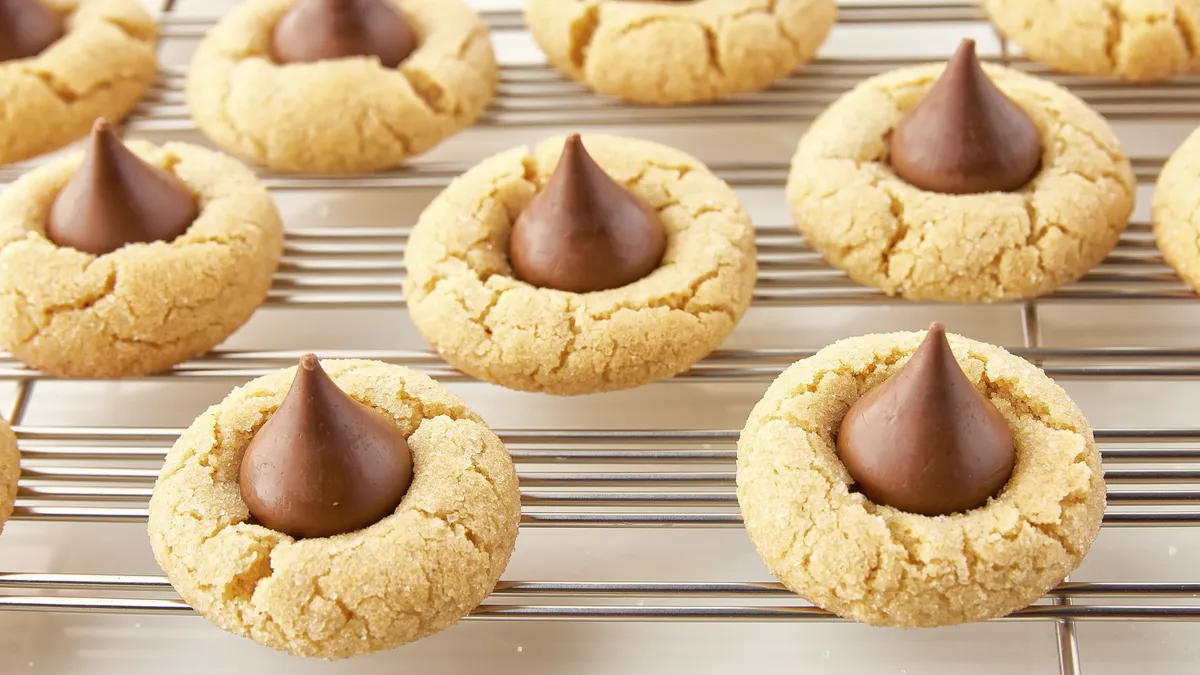
You can easily customize your peanut butter cookies to make them even more exciting. Try adding a handful of chocolate chips or chopped peanuts to the dough for extra crunch. Some people love to press a chocolate kiss candy into the center right after they come out of the oven. This turns them into “Peanut Butter Blossoms.” You could also drizzle melted white chocolate over the top for a fancy look. If you want a gluten-free version, there are recipes that use just peanut butter, sugar, and an egg, which work surprisingly well for those with allergies.
How to Store and Freeze Your Cookies
Keeping your treats fresh is easy if you follow a few simple steps. Store your cooled peanut butter cookies in a sealed jar or plastic bag at room temperature. They will stay delicious for up to five days. If you want to save them for later, you can freeze the baked cookies for up to three months. You can also freeze the raw dough balls! Just pop the frozen dough into the oven whenever you crave a warm snack. Just add two extra minutes to the baking time, and you will have fresh cookies on demand.
Frequently Asked Questions
1. Can I use crunchy peanut butter instead of creamy?
Yes! You can use either one. Crunchy peanut butter adds a nice texture and little bits of nuts to every bite. The measurements stay exactly the same.
2. Why did my cookies spread so much?
This usually happens if the butter was too melted or the dough was too warm. Try chilling your dough in the refrigerator for 30 minutes before baking to help them hold their shape.
3. Can I make these cookies without eggs?
Yes, you can use a “flax egg” or apple sauce as a replacement. However, the texture of the peanut butter cookies might be slightly more crumbly than the original version.
4. How do I know when the cookies are done?
Look at the edges. When the edges turn a light golden brown and the tops look set (not shiny), it is time to take them out of the oven.
5. Why do we put fork marks on peanut butter cookies?
Peanut butter dough is very dense. The fork marks flatten the cookie so it bakes evenly all the way through. Without pressing them down, the middle might stay raw.
6. Can I add oatmeal to this recipe?
Absolutely. Adding a half-cup of oats can give your peanut butter cookies a chewy, hearty texture. You may need to add a splash of milk if the dough gets too dry.
Conclusion
Making peanut butter cookies is a wonderful way to spend time in the kitchen. Whether you are baking for a school party or just a late-night snack, these cookies are always a crowd-pleaser. They are simple, nostalgic, and incredibly delicious. Now that you know all the secrets—from choosing the right butter to making the perfect fork marks—it is time to get baking! Don’t be afraid to experiment with chocolate chips or different types of nuts.